We've added Sky, Land, Fog, and Movement all that's left is Water, luckily Firefly has you covered for water and waves too, add a Firefly Node - Water to your frame. The default values will give you a nice choppy sea althogh that would be great normally our game is set in the mountains with a very calm moat, so big waves will look a littkle out of place, so we need to reduce the size of the waves dramatically.
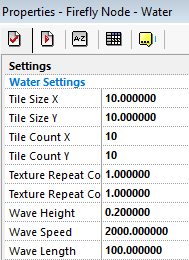
A wave height of 2 units is very windy drop this down to 1, just to give the water some movement just not much, the wave speed of 300 is again way to fast, our lake is very calm so raise the speed to 2000. It may sound strage but the speed of the water is how many cycles it takes to do one wave so the larger the number the longer it takes to do a wave cycle. A wave length of 10 is a bit too fast aswell so change that to 100, this value is how choppy the water is a small number means a smaller distance between each wave.
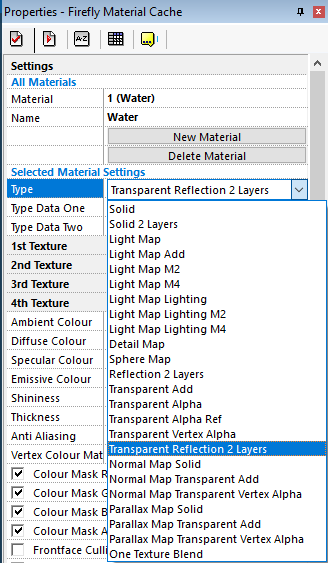
As with most Firefly Nodes that we see, we need to set a material on it, Add a new material to your cache call it Water and change the type from solid to Transparent Reflection 2 Layers this setting will make our water see-through and give a reflection of the sky, we could set the 1st texture as our sky reflection but as our water isnt very promienet theres not really much point if you had a very bright sun or moon in yoru sky then i would set the texture for the added realism, but for now skip it.
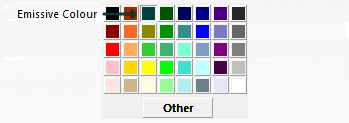
We also need to set the main color of the water, change the Emissive Colour to 0,64,64 which is the third color across the top, also set the fog value to ON, so that at long distances it doesn't look out of place. As we will no doubt be going underwater at some point turn off the frontface culling this will allow us to see the water when underneath it. Make sure you Load the Material from the cache at the start of the frame.
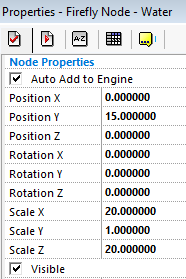
All we need now is to scale it and move it into position, set the scale X to 20 and the scale Z to 20 and set the position of the Y to 15, this will ensure it fits the whole of our terrain and raise it to the correct level. Have a look at the water in the game and hopefully it matches this.

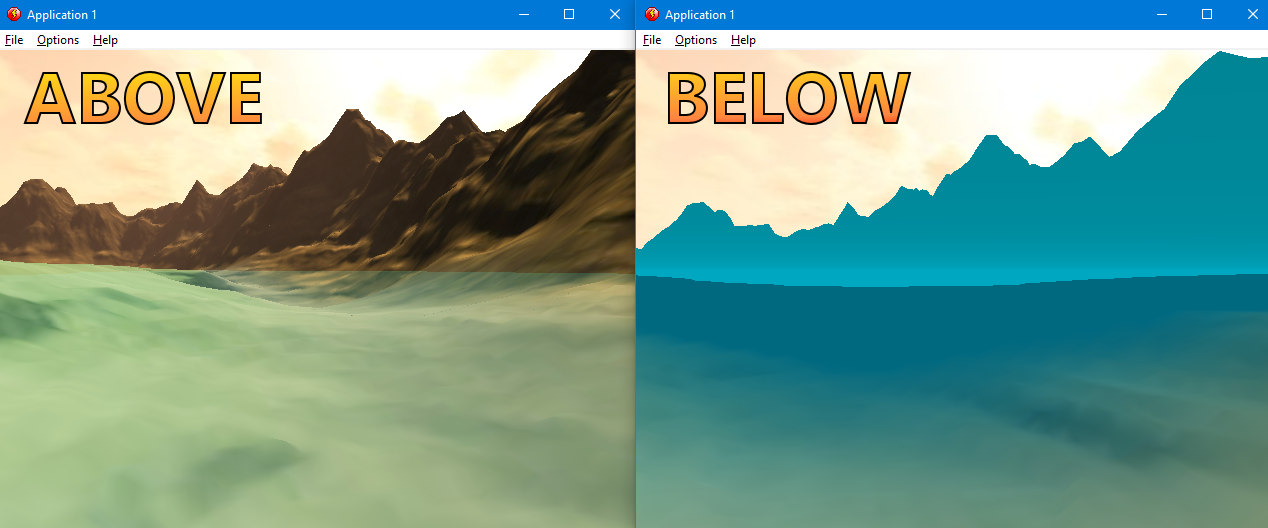
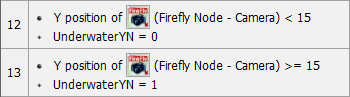
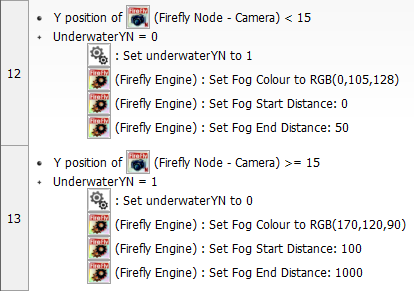
One last thing before we move onto the next step, most games when you enter water do some funky camera effects to ensure your know your underwater, so lets add a few in our game. As we just set our water position Y to 15, we can do a simple check that if our camera is lower than 15 then to do some effects, create a new condition, click on the camera and select Node Properties -> Position -> Compare Y position to a value change the comparision method to lower and enter 15 in the box. Also create another one which is greater or equal to 15.

If we just left them like that they would activate every frame and any effects we do would constantly be turning on, wasting precious CPU time. So we need to add a qualifier, insert a new condition onto the existing one, click the special icon and select Compare to a global value choose underwaterYN select equals and enter 0, do the same for the second one but change it to equals 1.
Now to set the effects for underwater, the first being the toggle for underwater set the gloabl value underwaterYN to 1, set the fog color to 0,105,128 and the fog start distance to 0 and the fog end distance to 100. we then need to reset them all back to how they were when we come back out of the water, set the gloabl value underwaterYN back to 0, set the fog color back to 170,120,90 the fog start distance back to 100 and the fog end distance back to 1000.
Although we only did a simple change you could add even more realism by adding a camera shader to give the image a wibbly wobbly effect and many other visual effects tricks but for now a simple fog routine will be realistic enough for this tutorial.