
For the Chocobreak 3D guide we only added a static camera and once it was setup that was it we left it in place and never really touched it again, while that was quick and easy we here at Clickteam know you are going to want to do more with your cameras so we want to make things as easy as possible for you, so we added a FPS mode to the camera settings. We need something to move the camera around and hopefully you guessed the best object for that is the movement object. Add one to your scene.
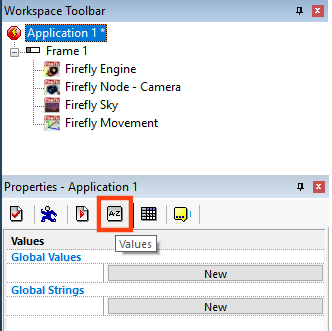
The FPS Camera mode relies on a few variables so lets setup some Global Values, if you have never setup global variables before you click on the title of your project, and then the values tab.
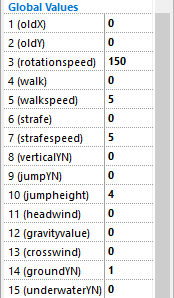
Setup the above values and enter the numbers as shown above, don't worry too much what they all mean at the moment, I will explain them all in a second and you can come back and adjust the values to suit your own playstyle.
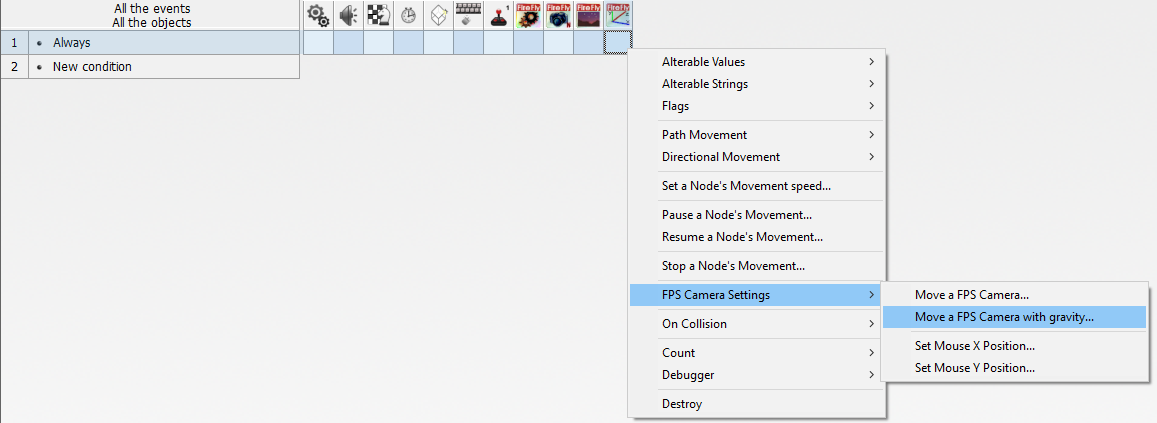
Create an always condition, where the Firefly Movement joins it select FPS Camera Settings -> Move a FPS Camera with gravity.
For each of the following questions use the mouse to select the correct answers
"Enter an Firefly Camera Node's Fixed Value" set to Fixed( "Firefly Node - Camera" ) click the camera node icon and select Retrieve fixed value
This value is asking which camera to move as a FPS camera.
"Select Firefly Engine Fixed Value" set to Fixed( "Firefly Engine" ) click the engine node icon and select Retrieve fixed value
This value is asking which engine contains the FPS camera.
"Enter Old XMouse Coordinate" set to oldX click the special icon and select Retrieve a global value choose oldX
"Enter Old YMouse Coordinate" set to oldY click the special icon and select Retrieve a global value choose oldY
The fps camera uses the old mouse values vs the new mouse values to judge how far the mouse has travelled.
"Enter New XMouse Coordinate" set to XMouse click the keyboard icon and select Current X position of the mouse
"Enter New YMouse Coordinate" set to YMouse click the keyboard icon and select Current Y position of the mouse
Both of these use Fusions in-built mouse routines that you should be familiar with already.
"Enter Rotation speed (decimal accepted)" set to rotationspeed click the special icon and select Retrieve a global value choose rotationspeed
This value is how fast should the fps camera turn, this is sometimes referred to as mouse sensitivity so we could set up an options page and allow the player to change it based on their personal preference.
"Enter Movement speed (decimal accepted)" set to walk click the special icon and select Retrieve a global value choose walk be careful not to choose walkspeed
This value we set manually based on when a character presses W or S (or any other key) that we will setup later in this step.
"Enter Strafing speed (decimal accepted)" set to strafe click the special icon and select Retrieve a global value choose strafe be careful not to choose strafespeed
Just like the walk value we set this when a character presses A or D (or any key).
"Enter Vertical movement (1 = On, 0 = Off)" set to verticalYN click the special icon and select Retrieve a global value choose verticalYN
This value sets whether the camera should move up and down in the direction the camera is pointing, turn this on when you want a free-look camera. when you are using a gravity value this will give a very bad camera shaking effect as the 2 forces fight each other.
"Enter Jumping movement (1 = On, 0 = Off)" set to jumpYN click the special icon and select Retrieve a global value choose jumpYN
This value will trigger the built-in jumping action.
"Enter Jumping speed (decimal accepted)" set to jumpheight / 10.0 click the special icon and select Retrieve a global value choose jumpheight and type / 10.0, which is a way to convert the Integer Global Values into a decimal one more on this later.
This value sets how high the jump should last.
"Enter Gravity X Velocity (decimal accepted)" set to crosswind click the special icon and select Retrieve a global value choose crosswind
This value will push or pull your camera along the X axis useful if you have a very strong crosswind, this effect will happen even if the camera is on the floor so make sure you only set it when the camera is in the air.
"Enter Gravity Y Velocity (decimal accepted)" set to gravityvalue click the special icon and select Retrieve a global value choose gravityvalue
This value will push or pull your camera along the Y axis which we more commonly refer to as gravity, when set to 0 the camera will act as a free camera, you could set it to something like +5 to allow for jetpack travel, earth like gravity is around -1 but you could use something like -0.3 to give moon based gravity etc.
"Enter Gravity Z Velocity (decimal accepted)" set to headwind click the special icon and select Retrieve a global value choose headwind
This value will push or pull your camera along the Z axis useful if you have a very strong headwind, this effect will happen even if the camera is on the floor so make sure you only set it when the camera is in the air.

Once finished your command should match this. As we explained earlier the camera compares the old x and Y values of the mouse to the new x and y values of the mouse. now that we have updated the camera, we need to set the oldX and oldY values. In the grid where Special Conditions and always join right mouse and select Change a global value -> Set for oldX, click the keyboard icon and select Current X position of the mouse and then again for oldY and click the keyboard icon and select Current Y position of the mouse.

Running the game now should allow you to move the camera around with the mouse.